Saturday, March 31, 2012

homemade fondant. easy, cheap & tasty.


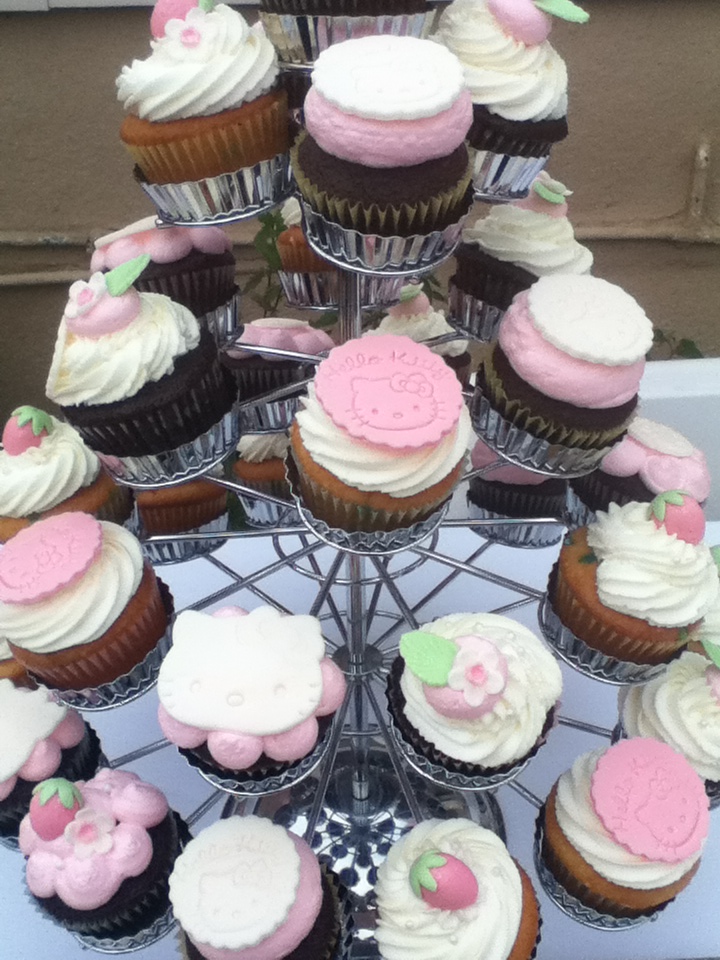
Strawberries and little blossoms made out of homemade fondant.

Ever since I learned how extremely easy it is to make my own fondant,
I haven't bothered buying the stuff from the bucket.
Store bought fondant is too expensive and the taste is too processed for my liking.


Hello Kitty cupcake toppers made out of homemade fondant.

All you need to make your very own homemade fondant is marshmallows, water,
vegetable shortening, powdered sugar and a bit of patience. Oh, and gel food
coloring, to color your fondant, in your choice of colors of course.


I love working with fondant to make small details that I can add on cakes and
cupcakes, like these small strawberries, leaves. blossoms and hello kitty toppers.
Occasionally I will cover cakes in it but I'm old fashioned and would rather
smother my cake with a nice frosting!


Marshmallow Fondant

Ingredients:

- 16 oz. white marshmallows
- 3 T. water
- 2 T. vegetable shortening
- 2 lbs. powderes sugar

Place the first three ingredients in a large bowl and then
place in microwave for one minute, stir ingredients together
with a spatula covered in non-stick pray until completely melted.

Add powdered sugar, enough to get a manageable dough.
It usually takes me about a cup and a half less than
the two pounds of sugar. You don't want to add so much
sugar that it completely dries out your fondant.

Once you have a manageable dough  grease your hands with
veggie shortening and use your hands to knead
the fondant until completely smooth about 5-8 minutes.

Cover in platic wrap and place inside a plastic bag.
Store at room temperature. Do not refrigerate.

To color fondant just add a little gel food coloring and
knead fondant until you work the color evenly into the dough.


To make fondant strawberries:

1. Color a piece of your fondant (size depending on how many strawberries you need)
using a pink or red gel food coloring and another smaller piece using a green gel food coloring,
for the leaves.

2. Roll into separate small balls, once you have as many as you need, give them a strawberry 
shape by molding with your fingers. Poke holes to resemble seeds using a toothpick.

3. Sprinkle cornstarch on you work surface (so fondant doesn't stick to surface) and roll out 
your green fondant, using the wilton small daisy fondant cutter cut out as many flowers as
you have strawberries. Use small paintbrush and water to adhere leaves to the tops of
strawberries. Let dry loosely covered with plastic wrap or in air tight container.

Use to decorate Cakes or cupcakes. For blossoms I used the wilton blossom plunger
like this one here. For the hello kitty toppers I used hello kitty cookie cutters from Sanrio.

Enjoy
xoxo

P.S. If  you have any questions, I'd be happy to help you out!


Thursday, March 29, 2012

birthday, cookies & cream rice crispy treats!


Puffed rice cereal is not popular in my house, it alwaaays goes stale.
We don't usually buy it either but I had a cake order that called for it and 
left me with 3/4 of an 18 oz. box left sooo I decided to not let the leftover
cereal go to waste this time! I made some rice crispy treats, who can 
say no to one of these? Exactly.


I decided to make my crispy treats extra special by making them cookies & cream-
rice crispy treats and extra extra special by using birthday cake oreos! 
My husband surprised me with two packs of these and then he got both my sisters
their own pack as well because in his words he knows how much I hate sharing.
Hey don't judge me I'm pregnant and I need my oreo fix! 
Yeah, we had plenty oreos to go around so once I was over my birthday cake oreo
craze I decided to use the rest to make these.

The crispy treats turned out super yummy and they were gone faster than you 
can say birthday cake oreos! Sent some to my friends and this recipe was definitely
a success. Way fun to look at, eat and make!

Would it be redundant to say that these would be perfect for a birthday party?

*These oreos are a limited edition and I don't know how much longer they will be
  available but you can always substitute the birthday cake oreos with regular oreos
  and 1/4 - 1/2 cup of sprinkles depending on your liking.


Birthday Cookies & Cream Rice Crispy Treats
recipe adapted from: Glorious Treats
makes 24 squares

You will need:

- 6 c. puffed rice cereal
- 12 birthday cake oreos or regular oreos and 1/4-1/2 c. sprinkles, crushed
- 5 c. mini marshmallows
- 3 T. butter

What to do:

1. Spray one 9x13" casserole dish or cake pan w/ non-stick oil spray and set aside.

2. In large plastic bag, crush oreos with whatever heavy object you may have
hanging around you. I like to use the flat side of my meat mallet, you can use a mug.
You don't want cookies crumbs here, you want bite size pieces and some smaller.
(If you are using regular oreos, you can crush oreos and sprinkles together or just
mix sprinkles in without crushing, whichever you'd prefer.)

3. Place large pan on stove over medium heat and add your butter and marshmallows.
Stir until butter and mallows are all melted together. Now you want add all 6 cups
of cereal plus the crushed oreos and take the pan off of the stove, use a spatula
sprayed with non-stick spray to stir everything together.

4. As soon ans everything is combined spread mixture into the prepared 9x13" dish.
Use the spatula to spread cereal mixture around dish and flatten down as needed,
you can use your hands in you'd prefer. Sprinkle the top with extra fun sprinkles,
I used star shaped sprinkles.

Allow to cool about 15 minutes minutes before cutting, Don't wait to long or they
will be hard to cut! 

To make these funner you could use cookie cutter and cut them out into cute shapes,
for this you cut right after you spread mixture into dish.

Enjoy
xoxo


P.S. This is the cake order I was talking about , Eiffel tower is made out of
crispy treats.


Tuesday, March 20, 2012

rainbow pancakes


Late night browsing through Pinterest I came across a picture of a stack of rainbow pancakes
and they were just so pretty that it inspired me to bake up my very own batch of colorful
pancakes, the next morning. No special occasion or anything just for my very own enjoyment
but kids would definitely go crazy over these, aren't they cute?

I made a batch of my favorite basic pancake recipe, (you will never buy boxed pancake mix
 again!) divided the pancake mix into six and added a tiny bit of food coloring to make all six 
colors of the rainbow. One batch of this recipe makes 12 thin pancakes; 2 red, 2 orange, 
2 yellow, 2 green, 2 blue and 2 purple. If you don't care for these pretty, colored pancakes
skip the food coloring and make a regular batch, way better than the stuff from the box!

Basic Pancakes
feeds 4-5
recipe from food network magazine

Ingredients:

- 1 1/2 c. flour
- 3 T. sugar
- 1 T. baking powder
- 1/2 t. salt
- 1 1/4 c. milk
- 1/2 stick butter, melted
- 2 eggs
- 1/2 t. vanilla extract

1. Whisk all dry ingredients together in medium bowl.

2. Whisk all wet ingredients together in a small bowl,
then whisk into the flour mixture until just combined.

3. Ladle a little less than 1/4 c. pancake batter onto a
hot buttered skillet and cook until bubbly. Flip and cook 
until golden on the bottom. 

Keep them warm in a 200 degree oven while you
finish cooking the whole batch.

Serve with syrup, jam or fresh fruit and whipped cream
and of course a tall glass of cold milk!


Enjoy <3
xoxo


Friday, March 16, 2012

olive garden inspired salad

I'll start off by saying that this isn't a copy cat recipe and I don't promise you that
this salad will taste exactly the same as the one you get at the famous Olive Garden
restaurants. This recipe is just something that I put together with the items in my pantry
and fridge, inspired by the limitless salad at Olive garden. Never the less, it is delicious!,
fast to whip up and you probably have all the ingredients on hand, my kind of recipe.

Olive Garden Inspired Salad
serves 4-6

Ingredients for dressing:

- 1/2 c. mayo
- 1/4 c. white vinegar
- 1 T. veggie oil
- 2 T. honey
- 2 T. parmesan cheese
- 2 T. romano cheese
- 1/4 t. salt
- 1/4 t. garlic powder 
- 1 T. lime juice

1. Whisk all ingredients together in a small bowl. 

Toss with:

- lettuce, about 4-5 c. chopped lettuce
- baby spinach, 4 c.
- tomatoes, 1-2 sliced tomatoes
- purple onion, about 1/2 small purple onion, thinly sliced 
- pickled pepperoncinis, 4-6
- croutons


I made this quick salad to accompany my home made stuffed crust pizzas.
Here is the recipe to an easy homemade pizza dough, which was a previous post
of mine. To make it stuffed crust, simply roll out pizza dough a bit thinner than
you would, place mozzarella cheese sticks on the edge of pizza and fold crust over.
I recommend that you try the bbq chicken jalapeno combination which is my
all time favorite!


Enjoy 
xoxo
<3


Here is a picture of my bby bump at 6 month 1 week, taken this passed Monday.
Time goes by so fast, it's kind of scary.

I also want to share with all of you that as of yesterday I am now a married woman.

It was fast and unexpected ( we had been planning our wedding day but decided
 on doing it once and for all ) and lovely and tough my family couldn't be there
do to all the unfortunate things that have been going on lately I know they are
happy for me and soon we'll have another ceremony with friends and family
and it will be just how we wanted it. 
What matters is that I couldn't of chosen a more kind, generous, loving man
to spend the rest of my life with and I couldn't be happier.

Saturday, March 10, 2012

Brussels Sprouts w/ Honey & Sriracha


I just recently tried brussels sprouts for the first time and I'm in love.

I had heard many things about brussels sprouts that made me nervous to try them.
They were once described as the least favorite veggie in some magazine article,
described as being bitter, others said bland. I'm so glad I just went ahead and
tried them for myself after my mom steamed some with a bunch of broccoli.
They are my new favorite thing.

So of course after I ran across this simple and unique recipe for brussels sprouts,
I immediately pinned it onto my food board and decided to try it out today for a
nice, quick and light dinner. I adapted it only slightly, the sprouts are originally
deep fried to give them a nice crispy texture, I chose to saute mine in a little olive oil
and add more sriracha than called for, they turned out absolutely ah-may-zinggg!

If you haven't ever tried brussels sprouts I highly suggest that you do and if
you already like sprouts, you will LOVE them once you try them this way!


Brussels Sprouts w/ Honey & Sriracha
serves 2 - 4

Ingredients:

- 1 pound brussels sprouts
- 3 T. sriracha sauce
- 3 T. honey
- juice of 1 large lime
- salt
- olive oil for sauteing

Cleaning your sprouts: remove a little of the stem and any discolored or yellow leaves.
Wash them well under running water or soak them in a bowl of water to get rid of any
dirt or insects. Dry thoroughly with paper towels or you will get hot oil all over you!

1. Trim some more of the stem end of the sprouts and gently separate the outer leaves
of the sprouts with your fingers, collecting in a bowl, when you reach the heart of the
sprout, add the heart to the bowl with the leaves.

2. In a small bowl, whisk the sriracha, honey and lime juice. Set aside.

3. Heat a little olive oil in a large sauteing pan, about 3-4 tablespoons. Once the oil
is hot add the sprouts and saute for 5-7 minutes, until brussels sprouts are lightly browned.
Season with salt to taste. Drizzle the honey/ sriracha sauce on top and toss to coat lightly.

That's it! You're done! This seriously takes about 10 minutes and is so delicious
as a side dish or served on top of white steamed rice (like I had them) as a quick
lunch/ dinner. Enjoy <3


On another note my family and I are going through a really though situation right now
and If I could kindly ask to be in your prayers, we need strength and patience to get
us through this, hopefully this will be over very soon. Thank you all so much.

xoxo


Saturday, March 3, 2012

glazed doughnut muffins


March already, how time flies... Summer is right around the corner bringing along my baby.
I'm so excited for all the changes coming up in my life. Everything seems to be falling into place.
Still haven't settled on a name, we actually only have one in mind. I'm opened to suggestions,
any boy names you guys fancy?

On the other hand I have yet another muffin recipe to share with you. One that I am absolutely
in love with! If you thought those earl grey poppy seed muffins were a gem, just look at these!
Doughnut muffin? but wait! it's glazed?? Didn't have to think twice about baking these when
I ran across the recipe on pinterest and I am so glad I did although I ate two in under a minute.

I'm sure you have all ingredients handy, give these a try you won't regret it!

xoxo

Glazed Doughnut Muffins
makes 12

Ingredients:

Batter:

- 1/4 c. butter ( half stick of butter)
- 1/4 c. veggie oil
- 1/2 c. granulated sugar
- 1/3 c. brown sugar
- 2 large eggs
- 1 1/2 t. baking powder
- 1/4 t. baking soda
- 3/4 t. grounded nutmeg ( I used freshly ground)
- 1 t. cinnamon
- 3/4 t. salt
- 1 t. vanilla extract
- 2 2/3 c. flour
- 1 c. milk

Glaze:

- 3 T. butter, melted
- 1 c. powdered sugar
- 1/2 t. vanilla extract*
- 2 T. hot water

* Recipe called for 3/4 t. vanilla extract, but i found the taste
of vanilla way to overpowering so I would suggest using 1/4 - 1/2 t.

1. Preheat oven to 425 degrees. Prepare a standard muffin tin, either
by lightly greasing it or using paper muffin cups.

2. In medium bowl cream together butter, oil and sugars until smooth.
   Add eggs, beating well until combined.

3. Stir in baking powder, baking soda, nutmeg, cinnamon, salt and vanilla.

4. Stir flour into butter mixture alternating with the milk, beginning and ending
   with the flour, just until everything is combined.

5. Spoon or scoop into prepared muffin tin, filling cups nearly full.

6. Bake 16 minutes, until muffins are a pale golden brown and
    inserted toothpick comes out clean.

7. In small bowl, prepare glaze by mixing together all ingredients and
whisking until smooth.

8. When muffins are slightly cooled,  dip the muffin crown into the glaze
and allow the glaze to harden. You can double dip if you wish, but I found
1 layer was more than plenty.

Serve warm or at room temp. Enjoy <3